As I mentioned previously, I worked on Day O' Shame this weekend, which is an event, ostensibly organized by Thyrsus (one of the student groups on campus), but really just organized by Chris Wilson, who is a senior in the drama department (and a CS major, amazingly).
Day O' Shame is essentially an annual 24-hour extreme playwriting experience. This year, there were a total of five writers, five directors, and 13 actors who signed up. Five teams of writers, directors and actors were created by drawing lots. Each writer was assigned a director, and each director/writer pair was assigned some number of actors. In this case, there were three 2-actor skits, 1 3-actor skit, and one 4-actor skit. The teams were then given an opening line, also assigned randomly, for their play, which they were obligated to use. This year, the lines were all drawn from video games.
At precisely 10PM on Friday night, each team started writing their scripts. The scripts were usually finished by early morning, by which I mean really late at night. I heard one team's script was finished at 3AM, and that was considered early. Most actors were allowed to sleep through the night, and the rehearsal process started the next morning. The directors rehearsed their actors intensively until 4PM Saturday, at which point tech was started, which is where I come in.
At this point, you might ask "Derek, how in the world could you design lights for five separate shows on 24 hours' notice?" The answer, of course, is that I didn't. I designed a single set of lights, called a "rep" plot, which I thought would largely be adequate for the needs of a wide variety of shows. The name "rep" is short for "repertory," and it comes from the fact that many theatres have a repertoire of several shows that might be playing at once, and rather than re-hang the lights every night (or even twice in a day) for each different show, they will just design one set of lights that work for all the shows they have running. There is a fairly formulaic way of doing this in theatre, which I will talk about when I get to the actual lighting plot a little later in this post.
Because I designed a rep plot for Day O' Shame, I had relatively little work to do. I came in on Thursday to hang, cable and focus all the lights, and with the help of my friend Sarah, I was done in about four hours. After that, there was very little to do until tech started at 4PM on Saturday. The one piece of preparation I had to do was hang what are called "specials".
Specials are what give rep plots their flexibility. A rep plot is very good at providing very generic illumination, but it is not good at lighting effects that are more specialized. Specialized lighting needs can include light in specific areas, light from specific directions, light of a specific (usually intense) color, light of a specific size, shape or quality, or lights which use gobos (small pieces of metal used to create patterns in the light). It is common practice with a rep plot to allow each show a small number of specials so that they can add a little more individualism to their performances.
With Day O' Shame, there were only two directors who requested specials, neither of which were particularly interesting. One just wanted top light in a certain specific place, and the other had someone standing on a block, which put her out of the normal light on stage, so I hung a special light to illuminate her face.
Now, regarding the actual plot. I had planned to scan my plot and post it here for you to view, but I forgot to take it home with me after the show, so I can't do that, sadly. However, I did take pictures of the set under a few different lighting conditions, so I'm posting those photos, and you can see what it looked like.
Creating a rep plot depends on the ability to provide the greatest number of "looks" (moods or feelings for a show) as you can with the fewest number of specialized lights. The standard way of doing this is to divide the stage up into evenly-spaced lighting areas (a lighting area is a region in which you guarantee there will be light), and to duplicate the same set of lights for each area. You can use pretty much any lights you want to light the areas, but the easiest way of doing the job is to have four lights from the front, one back light from each side, and a top light. Usually, two of the front lights are cool (bluish), and the other two are warm (yellowish). In general, cool lights and warm lights combine together to create white light (or at least, a color that our eyes can interpret as white).
By using both cool and warm lights from the front, you can create a cool look, a warm look, and a neutral look, and pretty much any combination of the looks, using only four lights. The back lights and the top light also include cool and warm colors, but these lights tend to have more saturated colors in them, to create modeling and highlights on the actors. This gives you quite a bit of flexibility using only seven lights per area.
However, sometimes seven lighting fixtures per area is too much. In the Village Theatre, where Day O' Shame took place, there are six logical places to put lighting areas (which would require 42 fixtures). Cast 'n' Crew, the student group who owns the theatre equipment for the Village, has 32 lights, and the theatre itself has only 24 electrical sockets (properly called dimmers--more on those in a later post) into which you can plug lights. So I had to compromise a bit when I was designing my plot.
Instead of four front lights, I used two--one cool, and one warm, and instead of using back lights, I used top lights in the front areas, and side lights in the back areas. This cut down on the number of different looks I could achieve, but it also allowed me to get basic lighting to cover most of the stage using only 12 fixtures, while still maintaining dramatic possibilities.
Here is a picture of the stage lit by the three upstage warm fixtures.
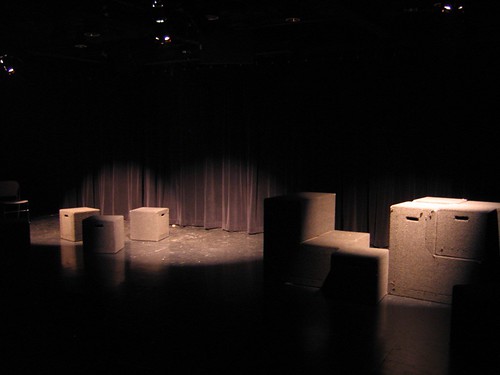
Notice how the light is all coming from approximately the same direction, and how it gives the scene a bit of a cozy feeling.
Compare that to the same set of blocks lit by the three upstage cool fixtures.
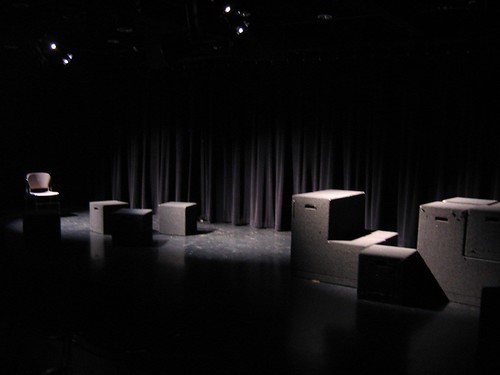
The light distribution is approximately the same (although it is coming from a different direction), but the overall look becomes more subdued, less friendly.
Now, take a look at what the top lighting looks like by itself.
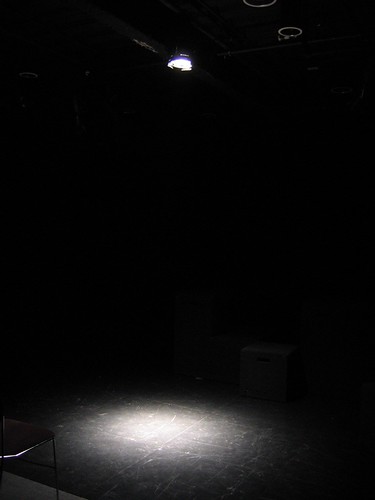
It's tough to see, since there's nothing underneath this to give you an idea of how the light plays on an object, but this top light will give lots of definition to the eyes, nose and mouth, since they are protrusions or sinks that don't get lit or get lit more brightly than the rest of the face. This makes it very dramatic lighting, an effect which is heightened by the fact that it is also very isolating to put someone in a pool of light like this, with the rest of the stage dark.
Lastly, look at everything put together:

This is both colors of front lights, plus some top lighting in the center section. See how the cool and warm combine to produce approximately white, and also notice that everything maintains some texture because the lights are coming from different angles, providing shadows.
That's about all I've got for now. My next post will cover the lighting plot that I am using for
Tick, Tick...Boom!, which is significantly more complicated than the rep plot here, although you will see that I incorporate many of the same ideas.
1 comment:
I'm impressed.
Post a Comment